UART Tip #26: “From Underpainting to Finish” with Susan Kuznitsky
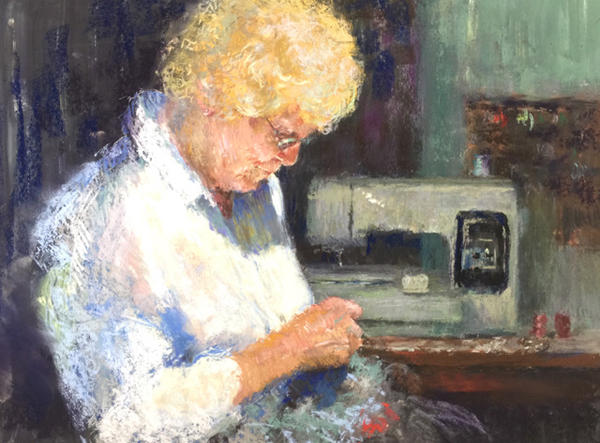
The subject for this demo is this very beautiful moment I caught of my dear friend Lora’s mother, Eileen. She is 92 years old, living with her husband and still creating gorgeous quilts.
I love how timeless and ageless creating art of all types can be.

Step One: The Underpainting

After an initial drawing with a light grey pastel pencil I laid down basic colors in simple shapes with hard and medium pastels. Next, I moistened a brush with denatured alcohol (Gamsol works as well) and brushed it over the pastel starting with the lighter colors. Use just enough solvent to be able to move the color around. After this dries I went back in with a pastel pencil to redraw some of the areas where I ‘lost’ the drawing moving the pastel and solvent around. This technique allows me to get a good strong base of color without using up the tooth of the paper.
Step Two: Begin Layering color

The underpainting stage leaves hard edges. As I begin to apply the next layers I will pay attention to softening these edges. I like to focus on the center of interest which in this painting is the glow of the light on her face and her hand. I began the first layer of color with my hard and medium pastels. As I layer colors here I use my pastel pencils to lightly blend the colors. I used a very warm golden color as the underpainting base color for her hair and in this step, I have started to add some cooler colors in the lights and beginning to shape the curls. I have begun layers of lights for her shirt. I used a variety of greys of similar values for the sewing machine.
Step Three: Refining layers
As I build up the layers I will add stronger color with my soft pastel and continue to use my pastel pencils to harmonize the colors without over blending and losing the beauty of the layered colors. I added details in the face. I added some other color in darker values to the background to add more interest. I am often asked about spray fixative. I NEVER spray a finishes pastel painting, but I do use it as a tool in the middle stages. This is a situation where I used it to ‘spot spray’. By this I mean spraying only certain areas. In this painting it was her white blouse. I do this to create more grit to add another layer of color. The fixative will darken the color but when I reintroduce the lights they will really pop.
Step Four: Finishing Touches

I changed the position of her hand slightly. I used another photo for this. I thought this angle was better for the overall composition and felt more graceful. Hands can really tell a story. To make this change I used a stiff brush and brushed down as much pastel as I could and re- drew the hand and began the layering process again. I also focused on lost and found edges. This stage is where I can see where to do this to enhance the painting. I added some fun bits of color to the spools of thread on the wall. The trick here was to create interest but not distract from my subject. I added enough highlights to the spools on the table to add a sparkle but again not distract. More middle value shapes were added in her blouse to create more form. I took away the piece of light in her shirt that you can see in step 3 because I found it distracting. This is the kind of decision that evolves as the piece nears completion. This stage requires a lot of stepping back and looking from a distance. Knowing when a painting is done is a skill in itself developed over time.
Visit Susan’s work at www.susankuznitsky.com.